Ksama Arora
Build a Pipeline
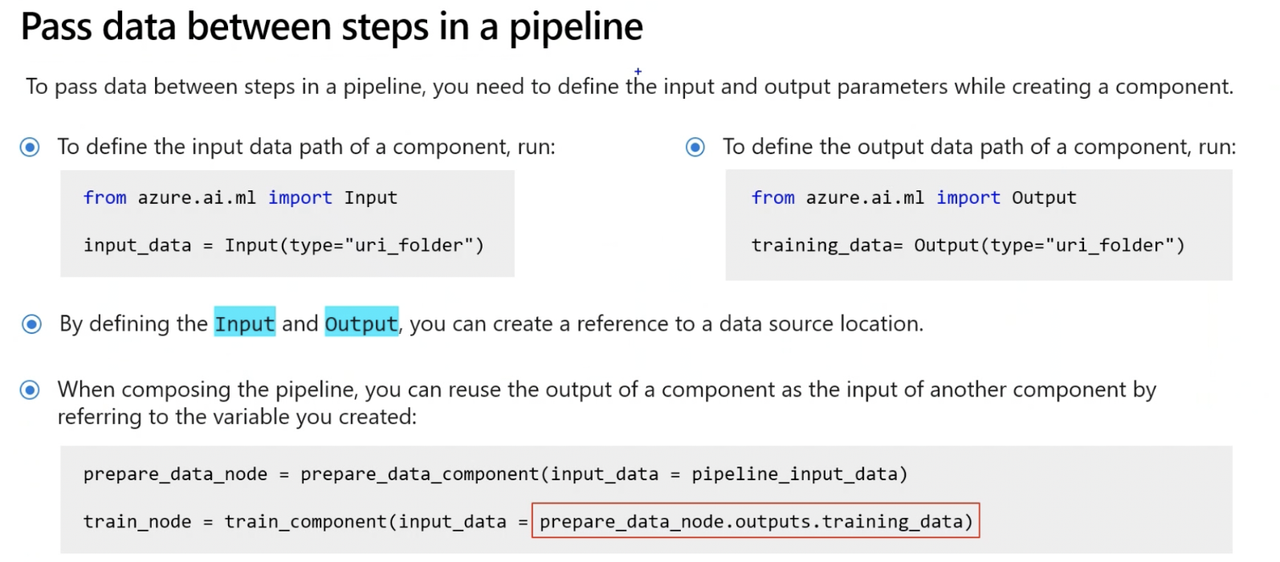
Define pipeline by creating a YAML file or use function @pipeline() function to create YAML file. PythonScriptStep is the pipeline step used to perform tasks in a sequence, such as one step that prepares input data and a following step that trains a model
IMP NOTE: To pass data between two pipeline using Python SDK
from azureml.data import OutputFileDatasetConfig
from azureml.pipeline.steps import PythonScriptStep
prepped_data = OutputFileDatasetConfig('prepped')
# Prepare Data Step
step1 = PythonScriptStep(
    name="Prepare Data",
    script_name='data_prep.py',
    arguments=['--out_folder', prepped_data]
)
# Train the model
step2 = PythonScriptStep(
    name="Train Model",
    script_name='data_prep.py',
    arguments=['--training-data', prepped_data.as_input()]
)
Step 1: Prepare data and Train model
from azure.ai.ml.dsl import pipeline

# Define the pipeline function
# The pipeline function expects pipeline_job_input as the overall pipeline input.
@pipeline()
def pipeline_function_name(pipeline_job_input):

    # First pipeline step: prepare data
    # The first pipeline step requires a value for the input parameter input_data, which is provided by pipeline_job_input.
    prep_data = loaded_component_prep(input_data=pipeline_job_input)

    # Second pipeline step: train model
    # The output of the first step is used as the input for the second step.
    # The second pipeline step is defined by the loaded component for train_model and results in a trained model referred to by model_output.
    train_model = loaded_component_train(training_data=prep_data.outputs.output_data)

    # Define pipeline outputs
    # Output 1: pipeline_job_transformed_data with the value of prep_data.outputs.output_data
    # Output 2: pipeline_job_trained_model with the value of train_model.outputs.model_output
    return {
        "pipeline_job_transformed_data": prep_data.outputs.output_data,
        "pipeline_job_trained_model": train_model.outputs.model_output,
    }
Step 2: To pass a registered data asset as pipeline job input, call function you created with data asset as input
from azure.ai.ml import Input
from azure.ai.ml.constants import AssetTypes

pipeline_job = pipeline_function_name(
    Input(type=AssetTypes.URI_FILE,
    path="azureml:data:1"
))
Step 3: Print the pipeline_job object created and review the YAML file created by running the @pipeline() function
print(pipeline_job) # printing the pipeline_job object you created
- Output will be YAML file including configuration of pipeline and its compoenents. Some parameters in YAML file are:
display_name: pipeline_function_name
type: pipeline
inputs:
  pipeline_job_input:
    type: uri_file
    path: azureml:data:1
outputs:
  pipeline_job_transformed_data: null
  pipeline_job_trained_model: null
jobs:
  prep_data:
    type: command
    inputs:
      input_data:
        path: $
    outputs:
      output_data: $
  train_model:
    type: command
    inputs:
      input_data:
        path: $
    outputs:
      output_model: $
tags: {}
properties: {}
settings: {}
Run a Pipeline Job
Step 1: Configure a Pipeline Job
After creating pipeline by either using YAML file or @pipeline() function, pipeline configurations can be edited if needed:
- Changing Output mode for pipeline job outputs
# change the output mode pipeline_job.outputs.pipeline_job_transformed_data.mode = "upload" pipeline_job.outputs.pipeline_job_trained_model.mode = "upload" - Set default pipeline compute if not specified
# set pipeline level compute pipeline_job.settings.default_compute = "aml-cluster" - Change default datastore to where all outputs will be stored
# set pipeline level datastore pipeline_job.settings.default_datastore = "workspaceblobstore" - Review pipeline configuration by printing pipeline job object
print(pipeline_job)
Step 2: Run a pipeline job/Submit pipeline job
# submit job to workspace
pipeline_job = ml_client.jobs.create_or_update(
    pipeline_job, experiment_name="pipeline_job"
)
After submitting, new job will be created. Pipeline job also contains child jobs, which represent execution of the individual components. Azure ML Studio creates graphical representation of pipeline.
Step 3: Schedule a Pipeline Job
To automate the retraining of a model, schedule a pipeline. There are various ways to create schedule.
- Create Time-based schedule using RecurrenceTrigger class
Sample schedule that fires every minute
from azure.ai.ml.entities import RecurrenceTrigger

schedule_name = "run_every_minute"

recurrence_trigger = RecurrenceTrigger(
    frequency="minute", # Unit of time to describe how often the schedule fires. Value can be either minute, hour, day, week, or month.
    interval=1, # Number of frequency units to describe how often the schedule fires. Value needs to be an integer.
)
IMP NOTE: Create a time-based schedule with cron expression
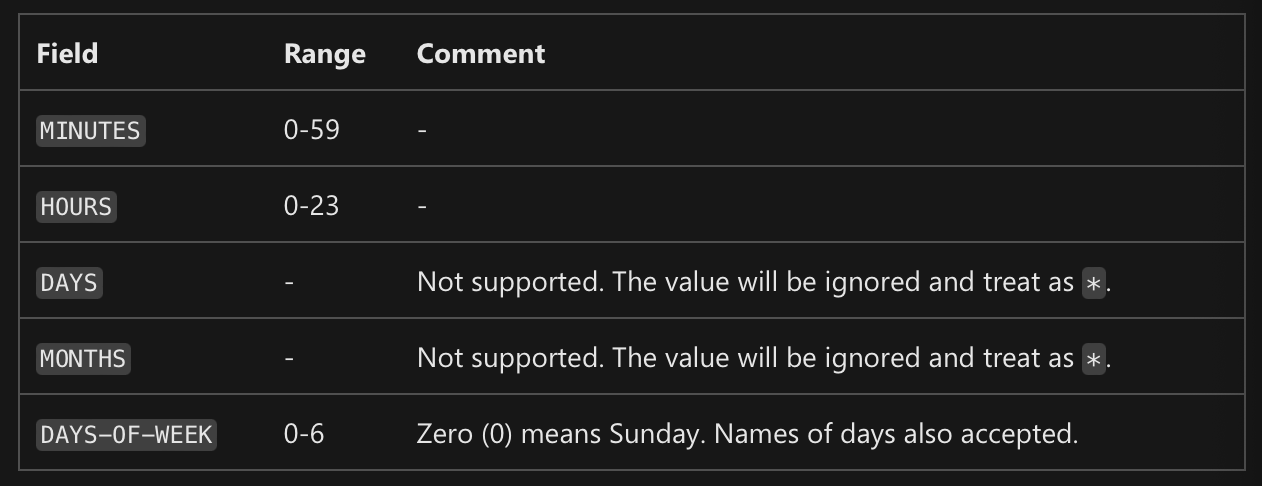
schedule_name = "simple_sdk_create_schedule_cron"
schedule_start_time = datetime.utcnow()
cron_trigger = CronTrigger(
    expression="15 10 * * *", # Syntax: Minutes  Hours  Days  Months  Days-Of-Week
    start_time=schedule_start_time,  # start time
    time_zone="Eastern Standard Time",  # time zone of expression
)
job_schedule = JobSchedule(
    name=schedule_name, trigger=cron_trigger, create_job=pipeline_job
)
- The expression 15 16 * * 1 means 16:15PM on every Monday
- For example, to schedule a pipeline, the cron schedule 0 2 * * * will operate at 2AM every night. The cron schedule 2 0 * * * runs every day at 2 minutes past midnight.
- Schedule pipeline using JobSchedule class
from azure.ai.ml.entities import JobSchedule

job_schedule = JobSchedule(
    name=schedule_name, trigger=recurrence_trigger, create_job=pipeline_job
)

job_schedule = ml_client.schedules.begin_create_or_update(
    schedule=job_schedule
).result()
- Delete schedule (Disable it)
  ml_client.schedules.begin_disable(name=schedule_name).result()
  ml_client.schedules.begin_delete(name=schedule_name).result()