Ksama Arora
Designing and Implementing Data Science Solution on Azure (DP-100)
Jul 13, 2024Contents
- Overview: Data Ingestion, Development Approaches, Azure ML Workspace, Resources and Assets.
- Design and Prepare ML Solution: Compute Types, Create Compute Targets, LAB 1: Azure ML Workspace
- Explore Data and Train Model: Key Terminologies, Data Preprocessing, Feature Engineering, Differential Privacy, Data Wrangling, LAB 2: Data Wrangling
- Build and Train ML Model: Azure ML Designer, LAB 3: Basic Pipeline, Automated ML, Python SDK
- Tuning Hyperparameters: Hyperparameters, Sampling Methods, Termination Policies
- Responsible AI dashboard and Pipelines: Create component, build and run pipeline
- Track models with Mlflow Job: Track and view metrics, evaluate and register model
- Deploy and Consume Models with Azure ML: Managed online-endpoint, batch endpoint, trigger workflows on github
Data Science Life Cycle & Responsible AI Guidelines - Overview
Designing a Data Ingestion Solution*
Overview: Extract raw data from source (CRM or IoT device) -> Copy and transform data with Azure Synapse Analytics -> Store prepared data in Azure Blob Storage -> Train model with Azure ML
| Type of Data | Description | Example |
|---|---|---|
| Tabular or Structured Data | All data has the same fields or properties, defined in a schema. Represented in tables where columns are features and rows are data points. | Excel or CSV file |
| Semi-structured Data | Not all data has the same fields or properties. Represented by a collection of key-value pairs. Keys are features, and values are properties. | JSON object from IoT device: { “deviceId”: 29482, “location”: “Office1”, “time”:”2021-07-14T12:47:39Z”, “temperature”: 23 } |
| Unstructured Data | Files that don’t adhere to any rules regarding structure. Can’t query the data in the database. | Document, image, audio, or video file |
Store data for model training workloads:*
When using Azure Machine Learning, Azure Databricks, or Azure Synapse Analytics for model training, three common options for storing data are:
Azure Blob Storage: Cheapest option for storing unstructured data. Ideal for storing files like images, text, CSV, and JSON
Azure Data Lake Storage (Gen 2): Best for storing large volumes (limitless) of unstructured data like CSV files and images. A data lake also implements a hierarchical namespace, which means it’s easier to give someone access to a specific file or folder (privacy-sensitive)
Azure SQL Database: Stores unstructured data that doesn’t change over time. Data is read as a table and schema is defined when a table in the database is created.
Create a data ingestion pipeline:*
- Azure Synapse Analytics:
- Used to create and schedule data ingestion pipelines through the easy-to-use UI, or by defining the pipeline in JSON format.
- UI tool like mapping data flow or using a language like SQL, Python, or R.
- Creates automated pipelines to copy and move data
- Allows to choose between different compute - serverless SQL pools, dedicated SQL pools, or Spark pools
- Azure Databricks:
- Opt for this if you prefer a code-first tool and to use SQL, python or R to create pipelines.
- Azure Databricks uses PySark, which distribute compute to transform large amounts of data in less time.
- Azure Machine Learning:
- Provides compute clusters (automatically scale up or down when needed).
- Used to manage all tasks with a single tool or run pipelines with on-demand compute cluster.
- Python is preffered language
- Can create pipeline using Designer.
- Intutive user interface
- Azure AI Services:
- Collection of pre-built ML models, this saves time and effort to train model
- Models are offered as an API (Application Programming Interface)
Selecting development approaches to build or train models*
Three ways to interact with Azure Machine Learning
- Azure CLI: Use this command-line approach for automation of infrastructure.
- Python SDK: Used to submit jobs and manage models from a Jupyter notebook, ideal for data scientists - code-first solutions
- Azure ML Studio: Use the user-friendly UI to explore workspace and other capabilities - low code training and development, data management and monitoring can be applied (automated ML & visual designer)
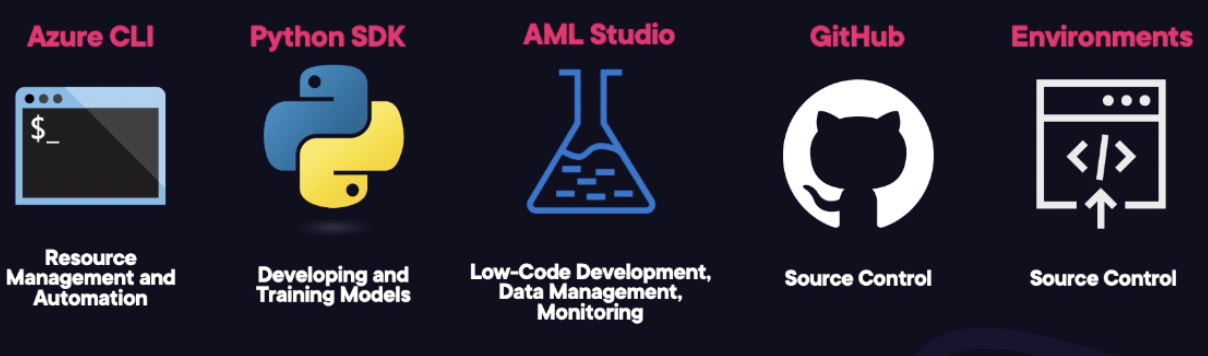
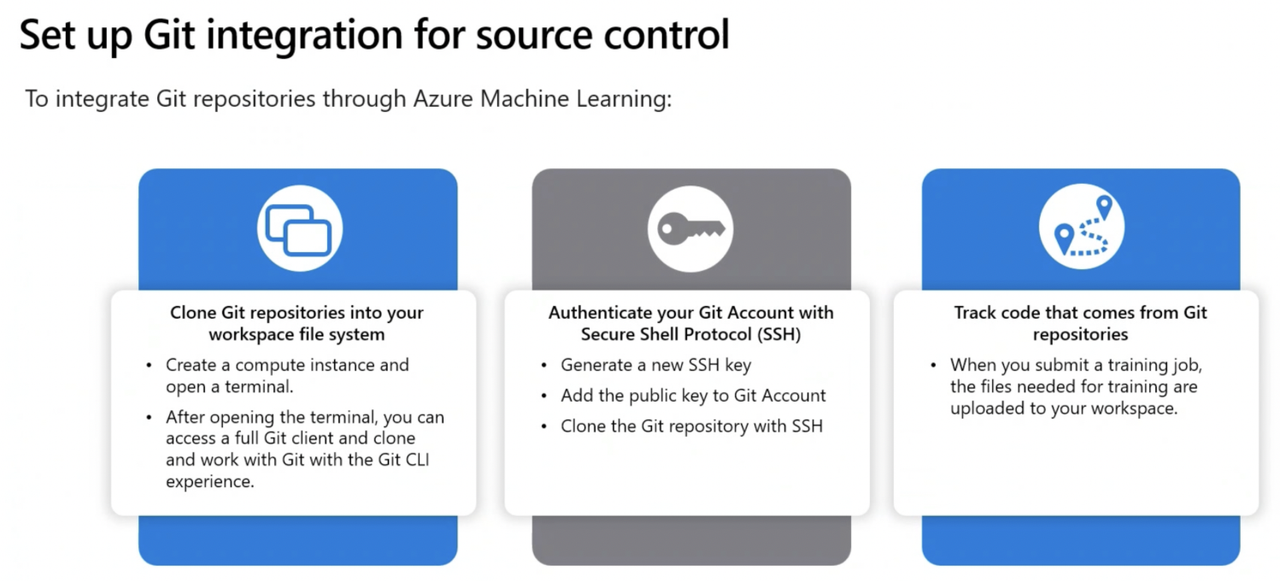
- Git: Azure ML Workspaces work indirectly with Git for source control, and you can use a local Git repository by cloning it (git clone url_of_repository)
Azure Machine Learning Environments* (Imp)
Environment: Can be another form of source control and multiple custom environments can be created or curated environments can be used. Contains python packages, environment variables, software settings, runtimes. Environment ensures version control, reproducible and auditable.
- Environment are divided into 3 major categories:
- Curated Environment: These are automatically created when ML workspace is created (pre-built environments). These environements are created and updated by Microsoft. Curated environments use prefix AzureML- - faster development time
- User-Managed Environment: You are responsible to set up the environement as install packages required for training the script. You are responsible for everything.
- System Managed: In this, Conda package manager will manage the python environment for you.
NOTE IMP: Cloud Based Environment
- Azure Data Science Virtual Machine: It is a cloud-based environment i.e. preconfigured with tools such as Tensorflow, scikit-learn, and the Azure CLI
- Azure Virtual Machine: Also cloud-based but not preconfigured with common data science and Azure tools
- VS Code and local computers are NOT Cloud-based environments
Azure ML Workspace
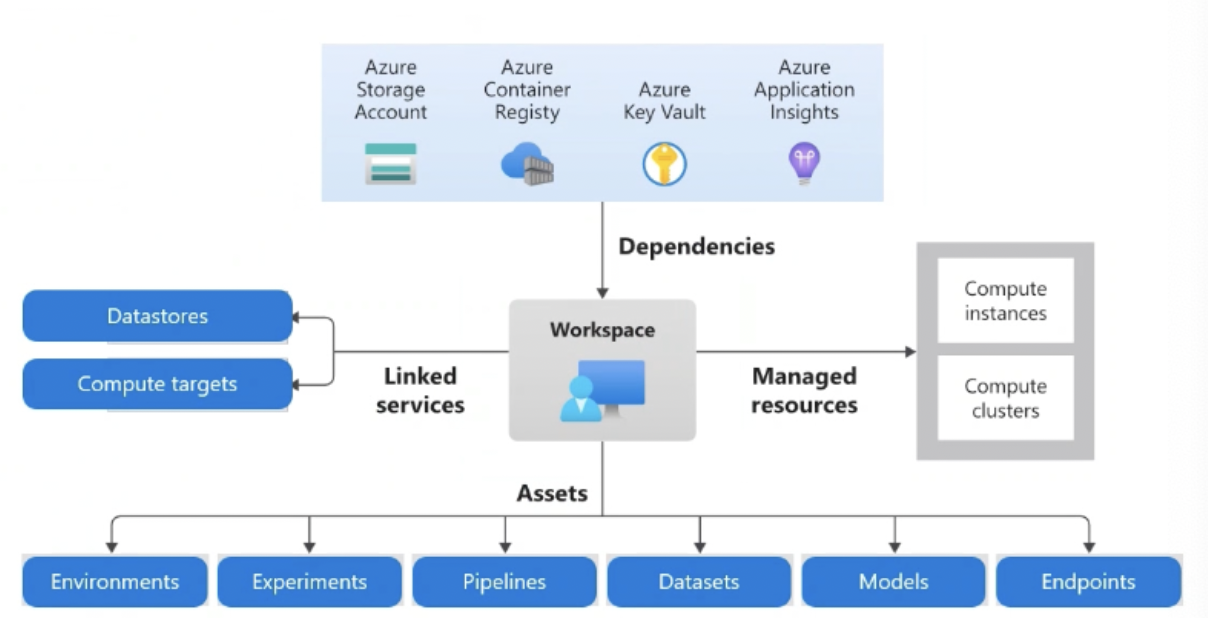
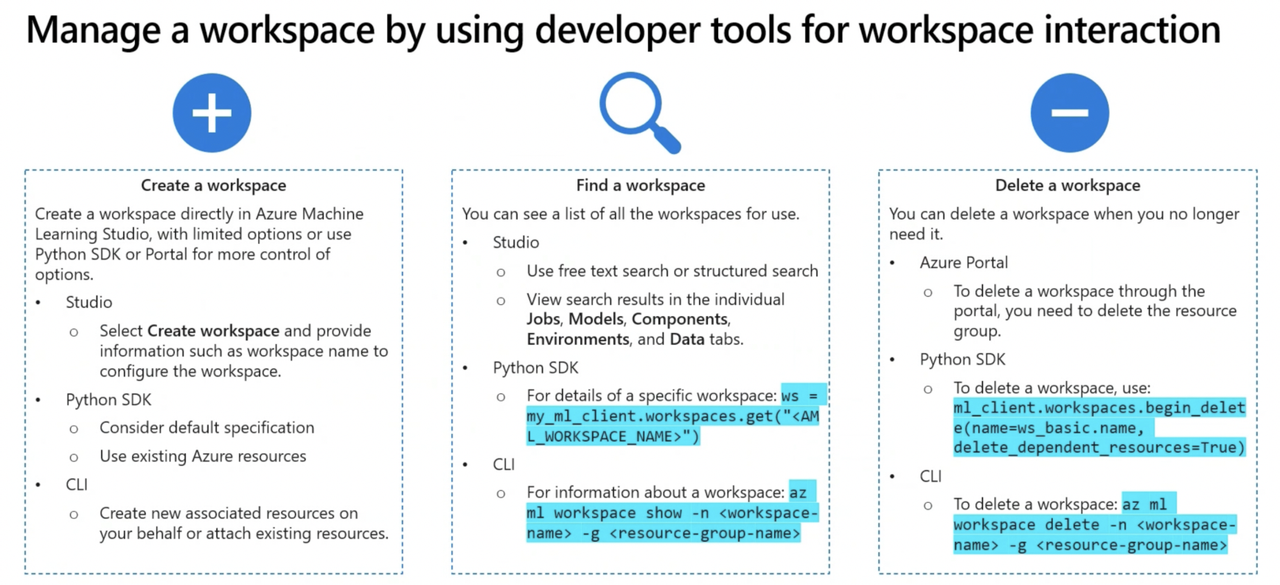
- The following are provisioned by default when you deploy an Azure Machine Learning workspace.
- Application Insights is used to monitor predictive services in the workspace.
- Azure key vault is used to securely manage & store secrets such as authentication keys and credentials used by the workspace.
- Azure storage account is used to store machine learning notebooks and logs related to machine learning jobs and other activities.
- Azure Container Registery is created when needed to store images for Azure ML environments
IMP: File formats
- Parquet files: These are recommended for ML tasks as they are compressed columnar format.
- Python files: These are scripts and not intended for data storage.
- CSV files or XLSX files: These are common for data processing but not optimised for ML tasks as they are row format
Resources and Assets*
Azure ML Resources: provide infrastructure and services to build solution
Workspace (explained above)
Compute Resources: 5 types - Compute Instance, Compute Clusters, Kubernetes Clusters, Attached Compute, Serverless Compute
Datastores
| Datastore | Description | Storage Type | Main Usage |
|---|---|---|---|
| workspaceartifactstore | Stores compute and experiment logs | Azure Blob | Logs for jobs |
| workspaceworkingdirectory | Stores files uploaded via the Notebooks section | Azure File Share | Notebook files |
| workspaceblobstore | Default datastore for storing uploaded data | Azure Blob | Data assets |
| workspacefilestore | General file storage | Azure File Share | General file storage |
- Azure ML Assets: are product or contents created and configured by data scientists and engineers
- Models
- Environments
- Data
- Compoenents
(I) DESIGN AND PREPARE A MACHINE LEARNING SOLUTION
Compute*
- Compute Target: is a compute resource/environment used to train and host model. Can use different compute target for each phase (training/production) of project.
| Compute Type | Description |
|---|---|
| Compute Instances | Similar to a VM - Primarily used to run notebooks - Ideal for experimentation - Easiest option to work with compute instance is through the integrated notebooks experience in the Azure ML studio. OR use VS Code for easier source control of your code. |
| Compute Clusters | On-demand multi-node clusters of CPU or GPU - automatically scale - used for large volume of data - allow for parallel processing to distribute workload - reduce time of run. - Ideal to use for production workloads |
| - Dedicated Cluster: These are just ready when you are - more expensive | |
| - Low-Priority Cluster: These systems are going to be ready when you are, probably. Low priority clusters may be accessed by multiple users thus you may get access to it but just in a few minutes or so - less expensive | |
| Inference Cluster/Kubernetes Cluster | Allows you to create or attach an Azure Kubernetes Service (AKS) cluster. BEST to deploy trained machine learning models in PRODUCTION SCENARIO. |
| Attached Compute | Allows you to attach other Azure compute resources to the workspace, like Azure Databricks, HDInsight cluster or Synapse Spark pools. Used for Specialized needs. |
| Serverless Compute | A fully managed, on-demand compute you can use for training jobs. |
- Central Processing Unit (CPU) or Graphical Processing Unit (GPU) *
- CPU - sufficient and cheaper to use for smaller tabular datasets
- GPU - powerful and effective for unstructured data - for larger amount of tabular data - libraries such has RAPIDs (developed by NVIDIA) allow data prep and training with large datasets
- General purpose or memory optimized *
- When creating compute resources, there are 2 VM sizes you choose from
- General purpose: Have a balanced CPU-to-memory ratio. Ideal for testing and development with smaller datasets.
- Memory optimized: Have a high memory-to-CPU ratio. Great for in-memory analytics, which is ideal when you have larger datasets or when you’re working in notebooks.
- When creating compute resources, there are 2 VM sizes you choose from
- Spark Compute / Clusters *
- Spark cluster consists of driver node and worker nodes. Code will initially communicate with driver node. The work is then distributed across the worker nodes. This reduces processing time. Finally work is summarized and the driver node communicates the result back to you.
- Code needs to be written in Spar-friendly language like Scala, SQK, Rspark, or PySpark in order to distribute the workload.
Apache Spark Tools as Compute Targets
Azure Synapse: It is an enterprise analytics service platform that enables data warehousing, analytics, processing and integration and pipeline framed with a massively parallel processing architecture. Synapse supports bot SQL and Spark technologies.
Azure Synapse Spark Pools:
- When setting up a Synapse Spark pool as an attached compute target in Azure Machine Learning studio: Select an existing Azure Synapse workspace and an existing Spark pool in that workspace -> tick the option to set up a managed identity -> Choose system-assigned or user-assigned -> To reliably connect to your new compute resource to run workloads, Go to synapse studio and assign managed identity in Azure ML to role of Synapse Administrator.
Serverless Spark Pools can be used as a form of compute to set up notebooks in Azure ML Studio
IMP:
- Local compute is used with low volume of data to use for training workload. Thus it will not incur costs in Azure, as you have already bought the machine.
- Inference cluster is designed for inference and not for training. It will incur costs in Azure.
- Compute cluster is oversized for low volume of data. This will also incur costs in Azure.
Create Compute Targets for Experiments and Training:*
Azure ML compute instance or compute clusters can be created from:
- Azure ML Studio
- Python SDK
- Azure CLI
- Azure Resource Manager Templates (can re-use compute from the ARM templates)
Create Compute Target using Python SDK and CLI (Imp)
Configure Attached Compute Resources*
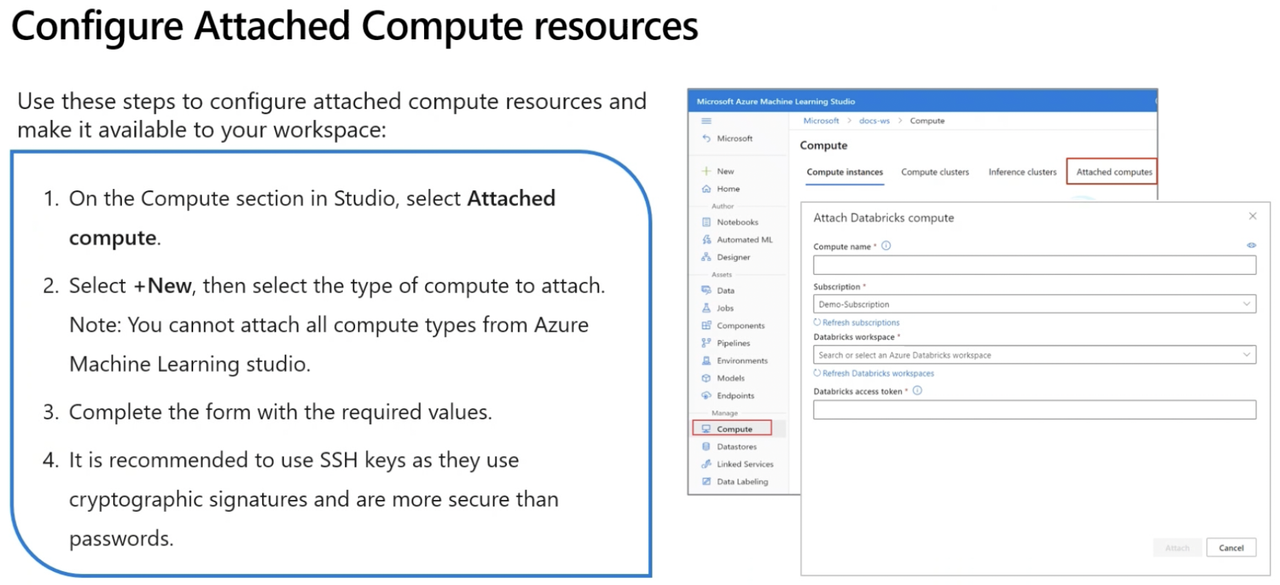
Attached Compute - HD Insights and Apache Spark
from azureml.core import RemoteCompute, ComputeTarget
# Ubuntu VMs only
# VM must have public IP addy
my_resource_id = "/subscriptions/<subscription_id>/resourceGroups/<resource_group>/providers/Microsoft.Compute/virtualMachines/<vm_name>"
my_compute_target_name = "attached_existingVM"
attached_target_config = RemoteCompute.attach
#
attach_config = RemoteCompute.attach_configuration(resource_id='<resource_id>',
                                                    ssh_port=22,
                                                    username= '<username>'
                                                    password="<password>")
# Attach the compute
compute = ComputeTarget.attach(my_ws, my_compute_target_name, attached_target_config)
compute.wait_for_completion (show_output=True)
Note: When considering attaching an existing virtual machine to your Azure ML workspace as a compute target, it’s crucial that the external Vms must be Ubuntu only and must have an public IP address only.
However, the primary reason for choosing an existing VM over a new compute instance is to utilize unused capacity effectively.
Create Azure Machine Learning Workspace - Lab 1
(II) EXPLORE DATA AND TRAIN MODEL
Terminologies:*
URI (Uniform Resource Identifier):*
- It specifies location of data/resource.
- To connect Azure ML to your data, a protocol needs to be prefixed to the URI.
- The three common protocols are:
- http(s): Use for data stores publicly or privately in an Azure Blob Storage or publicly available http(s) location. (Protocol used when accessing data stored in publicly available http(s) location)
- abfs(s): Use for data stores in an Azure Data Lake Storage Gen 2.
- azureml: Use for data stored in a datastore.
Datastores:*
- Datastores are reference to existing Azure Storage resource and are used to read data directly from that source.
- Benefits:
- Provides easy-to-use URI to your data storage
- Facilitates data discovery within Azure ML
- Securely stores connection information, without exposing secrets and keys to data scientists
- Two methods for authentication:
- Credential Based: Use a service principal, shared access signature (SAS) token or account key to authenticate access to your storage account
- Identity-Based: Use your Microsoft Entra identity or managed identity
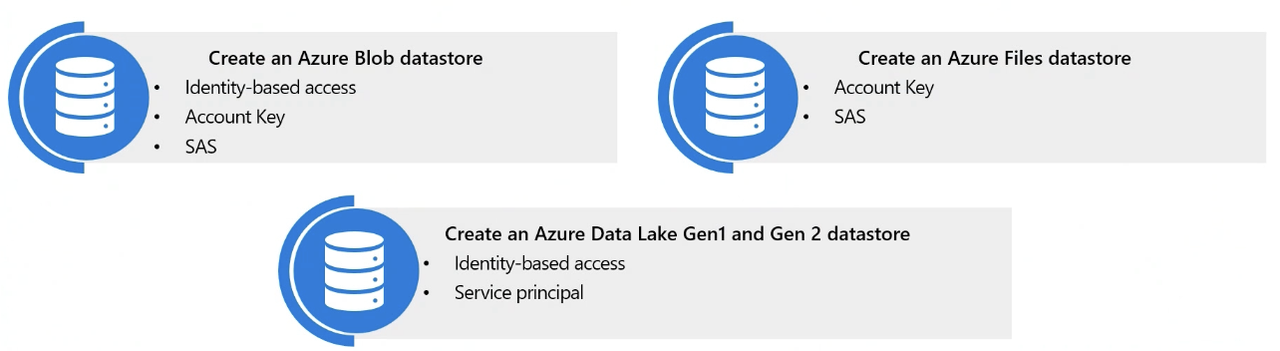
- Types of datastores:
Data Assets:*
- They are references to data in datastores
- Benefits:
- Can share and reuse data
- Can seamlessly access data during model training or any supported compute type
- Can version metadata of the data asset
IMP Note:
Three types of data assets (SDK v2):
- URI file: Points to specific file
- URI folder: Points to specific folder (Folder contains multiple files like images, text, audio, video files etc)
- ML Table: Dedicated to tabular data i.e. points to folder or file, including a schema to read as tabular data
Note FileDataset and Tabular Dataset belong to previous version of SDK
Data Asset Management: It is the implementation and monitoring of datastores and datasets. It is version and tracking. It is registering and retrieveing those versions. It is how we are monitoring datasets and how we look at drift detection. We can access datasets that Azure provides and look at public datasets
Create Datastores and Data Assets using Python SDK (Imp)
Mounting and Downloading Files for Datasets
| Mount Files | Download Files | |
|---|---|---|
| Description | Files do not reside in compute | Files downloaded to compute |
| Processing | More streaming - means more processing/moving of data | Less streaming - less processing as data has been downloaded |
| Usage | Good if you don’t use all files from dataset | Good if you use all files from dataset |
| Available for | Datasets created from ADLS, SQL, Database, PostgreSQL | Datasets created from ADLS, SQL, Database, PostgreSQL |
Preprocessing of Data
Steps for Preprocessing of Data:
- Data quality assessment
- Data Cleaning: Look for Missing data, Noisy data
- Data transformation: Aggregation, Feature selection & engineering, Normalization (combining all the data so that everything is standardized), converting categorical features into numerical indicators, dropping high cardinality features like IDs
- Data reduction: employ math to filter out unnecessary data
Feature Selection and Feature Engineering
Feature Selection: The process of selecting specific variables (features) that contribute the most to the prediction variable in our algorithms.
Feature Engineering: The process of selecting and expressing data in a way that improves the performance of machine learning models.
- Wrapper method: Wrapper methods evaluate subsets of features by training a model on them and assessing the model’s performance. All combinations are evaluated and the best one is chosen. Prone to overfitting
- Filter method: Filter methods apply statistical techniques to evaluate the relevance of each feature independently from the machine learning model. They assign a score to each feature based on various statistical tests and rank them accordingly. Thus Features can then be included or removed from the dataset based on their scores. This method is relationship based. Faster than wrapper method.
Differential Privacy: Eg of Responsible AI*
Differential Privacy seeks to protect individual data by adding statistical noise to the analysis process. Minimizing risk of personal identification and ensuring data privacy. It ensures that the output of a data analysis algorithm does not reveal sensitive information about any individual.
- When applying differential privacy, Epsilon (ε), Bounds and Sample size needs to be defined
- Privacy Loss Paramter/Epsilon (ε) is a key parameter in differential privacy that controls the balance between privacy and accuracy - Value ranges between 0 and 1
- Low Epsilon (ε): High privacy - Low accuracy - More noise - High data obscurity - Data more difficult to interpret
- High Epsilon (ε): Low Privacy - High accuracy - Less noise - Less data obscurity - Data more accurate and easier to interpret
# Sample code snippet
privacy_usage = { 'epsilon': 0.10},
                data_lower = lower_range[1],
                data_upper = upper_range[10],
                data_rows = sample
Accessing Data During Interactive Development (Imp)
Data Wrangling: It is the process of transforming data to a format that’s best suited to the needs of ML model.
Wrangle Data with Python in Azure ML - Lab 2
(III) THREE WAYS TO BUILD AND TRAIN ML MODEL
(A) Build & Train Models using Azure ML Designer
- Step 1: Open Azure ML Studio -> Select Designer
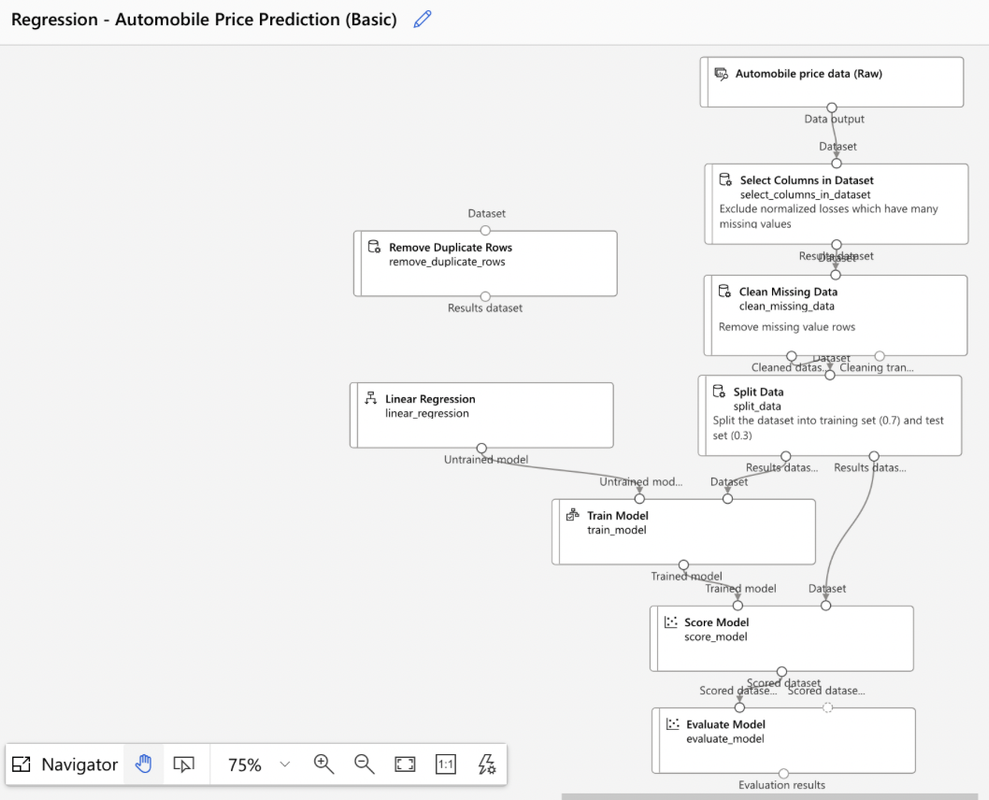
- Step 2: Create new pipeline (Classic Pre-built/Custom). Say we select a classic pre-built model for example - Regression Automobile Price prediction (Basic)
- Step 3: Now run this model by setting up a pipeline job and a compute
- Step 4: Evaluate the model based on metrics: coefficient of determination, mean absolute error, relative absolute error, relative squared error, root mean squared error
Dataset -> Select Columns in Dataset -> Clean Missing Data -> Split Data & (Linear Regression) -> Train Model -> Score Model -> Evaluate Model
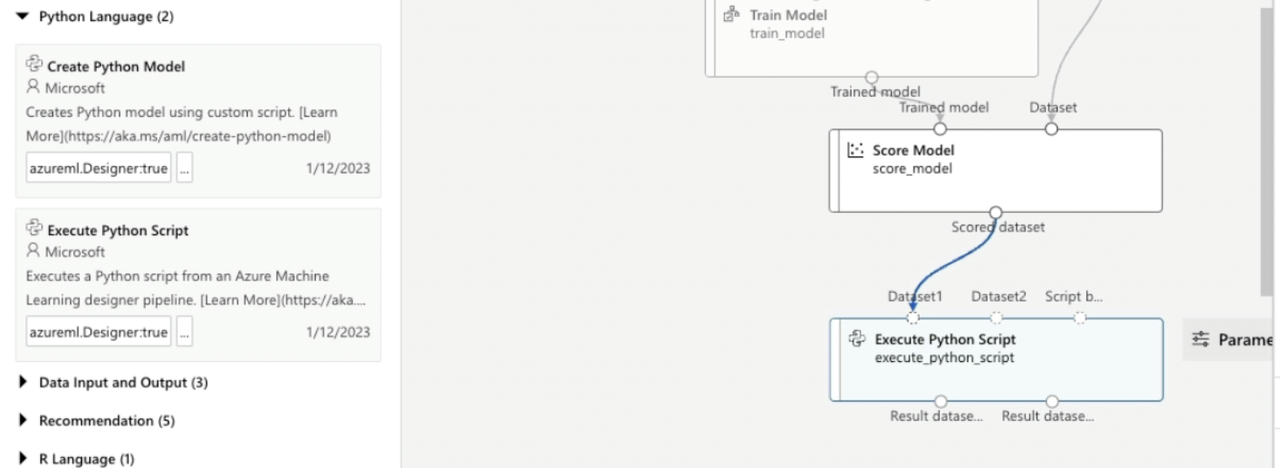
Custom Code Components
Custom code modules are created using Python. Supported libraries include NumPy, SciPy, scikit-learn, Theano, TensorFlow, Keras, PyTorch, pandas, and matplotlib
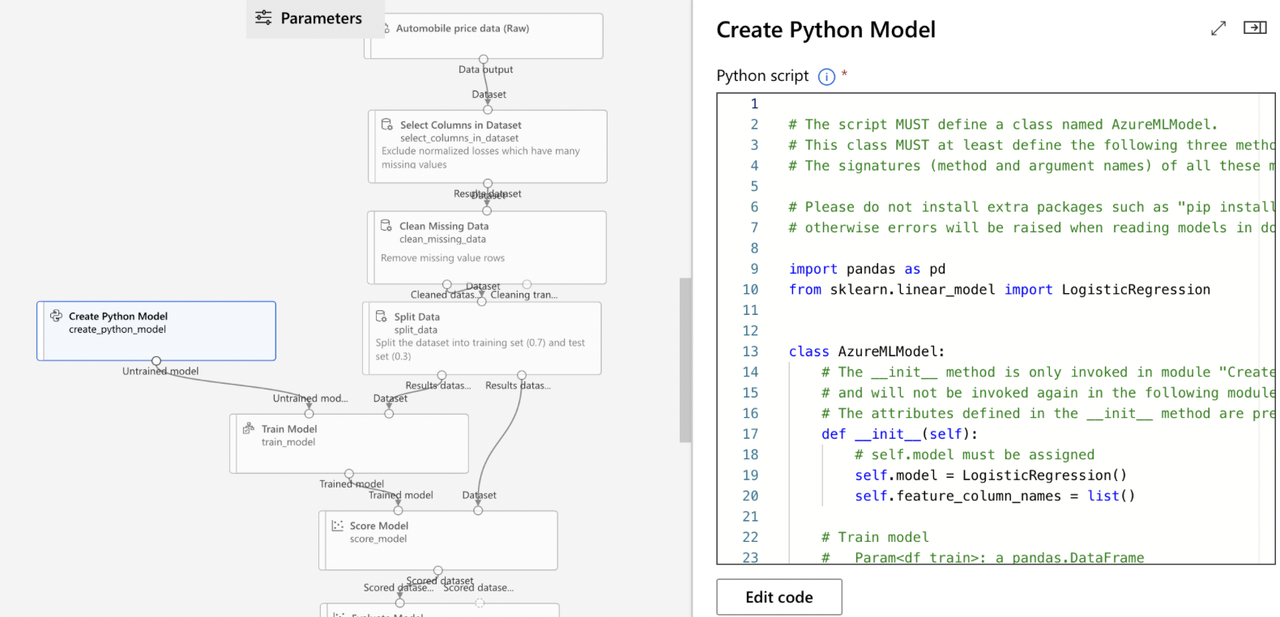
- Create Custom Model: Develop your custom model using “Create Python Model” module
- Link the custom model to the “Train Model” module to train it with your dataset
- Since standard evaluation modules are not compatible, use the “Execute Python Script” module to run evaluation scripts for the custom model
IMP NOTE:
- An Execute Python Script component must implement azureml_main method .
- A Create Python Model component must implement train and predict methods.
- A load_data method is used to construct a data object but is NOT A PART of the Execute Python Script
NOTE IMP:
Algorithms used in creating pipeline
- Multiclass Decision Forest: algo will make predictions between several categories
- Bayesian Linear Regression: algo will forecast a numeric value
- Boosted Decision Tree Regression: algo will forecast a numeric value
- K-means: algo will separate data points into groups
- Two Class Boosted Decision Tree: supports non-linearity of model
- Two Class Logistic Regression, Two Class Support Vector Machine, and Linear Regression: does NOT support non-linearity of model i.e. relies on linearity assumption in the problem they are used to solve.
Create a basic pipeline in Azure ML Studio - Lab 3
Filter Based Feature Selection Module
- Configuration Options:
- Operate on Feature Columns only - True/False
- Number of desires features (Specify the number of features to output in the results): 1
- Feature scoring method - PearsonCorrelation/ChiSquared
- Target Column: Specify target column
Pearson Correlation vs Chi-Squared Statistics
| Aspect | Pearson Correlation | Chi-Squared Statistics |
|---|---|---|
| Purpose | Measures the strength and direction of a linear relationship between two quantitative variables | It is a comparative test that reveals how close expected values are to actual results. |
| Correlation Coefficient (R) | Ranges from -1 to +1: - 0: No correlation - +1: Perfect positive correlation - -1: Perfect negative correlation | Ranges from 0 to 1 - No correlation coefficient - lower values indicate a better fit to expected values |
| Type of Variables | Quantitative | Categorical |
| Interpretation | - Positive Correlation: e.g., More rain increases humidity - Negative Correlation: e.g., Higher altitude decreases temperature | Indicates whether a relationship exists but does not specify the type (positive or negative) |
| Value Indication | Indicates the strength of the relationship | Smaller values indicate a better fit and existence of a relationship |
| Steps | 1. Determine linearity 2. Clean data 3. Generate the coefficient 4. Evaluate the results |
Permutation Feature Importance Module
It refers to randomly shuffling data while keeping everything else constant and then seeing if we have a change in whatever feature column we were looking at. From that we can generate new prediction based on results. Compute feature importance score by calculating decrease in quality
- Configuration Options:
- Random seed (Random number generator seed value - It is going to randomize the data) = 1023 (Say)
- Metric for measuring performance:
- Classification metrics - Accuracy (how accurate model is), Precision (how good model is), Recall (how many times model was able to detect a specific category)
- Regression metrics - Mean Absolute Error, Root Mean Squared Error, Relative Absolute Error, Relative Squared Error, Coefficient of Determination (R squared)
Applying Automated ML to Explore Models
Automated ML democratizes machine learning with a no-code approach, making it easy to explore optimal machine learning models. Automated ML handles preprocessing, featurization, transformation, scaling, and normalization. At the end, it scores the model by selecting a metric and deploying the model. Automated ML is used for exploring optimal algorithms and parameters to solve a particular problem without a lot of human trial-and-error.
- Types of algorithm in automated ML: Classification, Regression and Time Series Forecasting
Examples of Automated ML:
- Tabular Data
- Computer Vision
- Natural Language Processing
Configure and submit Auto ML experiment using Python SDK* (Imp)
Step 1: Create ML Client
Step 2: Define MLTable: (ML Table is already inputted)
Step 3: Define the AutoML Job
from azure.ai.ml.constants import AssetTypes
from azure.ai.ml import automl, Input

# Create an Input object for the training data
my_training_input = Input(
    type=AssetTypes.MLTABLE,
    path="./data/training-mltable-folder"
)

# Configure the classification job
my_classification_job = automl.classification( # for classfification, automl.classfication function is used
    compute="aemcmlcompute",
    experiment_name="this_experiment",
    training_data=my_training_input, # my_training_input refers to MLTable data asset created in Azure ML workpsace
    target_column_name="try_me",
    primary_metric="accuracy",
    n_cross_validations=4,
    enable_model_explainability=True,
    tags={"my_tag": "My value"}
)

# Specify Primary Metric (Important to specify)
# The primary metric is the target performance metric for which the optimal model will be determined.
# Set the primary metric to the performance score for which you want to optimize the model.

# To retrieve the list of ClassificationPrimaryMetrics available
from azure.ai.ml.automl import ClassificationPrimaryMetrics
list(ClassificationPrimaryMetrics)

# Set optional limits to minimize cost and time spent on training by set_limits()
my_classification_job.set_limits(
    timeout_minutes=600, # timeout_minutes: Number of minutes after which the complete AutoML experiment is terminated.
    trial_timeout_minutes=20, # trial_timeout_minutes: Maximum number of minutes one trial can take.
    max_trials=5, # max_trials: Maximum number of trials, or models that will be trained.
    enable_early_termination=True # enable_early_termination: Whether to end the experiment if the score isn't improving in the short term.
)
# Note: Can use multiple trials in parallel to save time. If using compute cluster, can have as many parallel trials as the max number of nodes
# Note: If you want to set max number of trials to be less than max number of nodes, use max_concurrent_trials

# Set optional training properties
my_classification_job.set_training(
    blocked_training_algorithms=["logistic_regression"],
    enable_onnx_compatible_models=True
)
- Step 4: Submit & Monitor Auto ML Job run
# Submit the AutoML job
returned_job = ml_client.jobs.create_or_update(
    my_classification_job
)
returned_job.services ["Studio"].endpoint

# Monitor Auto ML job runs
aml_url = returned_job.studio_url
print("Monitor your job at", aml_url)
IMP NOTE:
To create a reference to data source location, use Input class. The data will remain in the source location. The Output class is similar, but for output of the components.
NOTE: Set the featurization mode to “off” if you don’t want the automated machine learning to make changes to the data (no preprocessing of data). ALSO The target is the column you want to predict. The primary metric is the performance score for which you want to optimize the model. Set the primary_metric to ‘AUC_weighted’ to optimize for the AUC_weighted metric.
(B) Build & Train Models using Azure Automated Machine Learning - Lab 4*
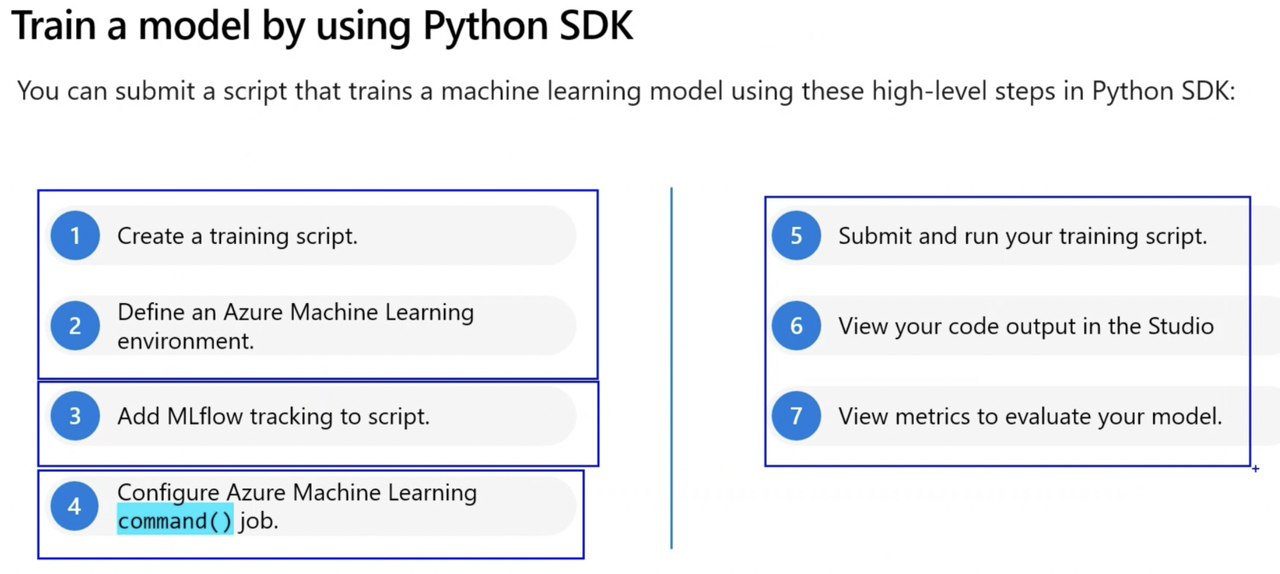
(C) Training Model by using Python SDK*
Tuning Hyperparameters in Azure Machine Learning*
Parameters are values determined from the training features as parameters. Hyperparameter are values used to configure training behavior but which are not derived from training data. Hyperparameters: Top-level settings you configure before running the ML algorithm, such as: train-test ratios, number of epochs, batch size.
Types of Hyperparameters*
Discrete Hyperparameters:
- Specified as choice among discrete values (explicit values/finite set of possibilties) which can be defined using:
- python list (Choice(values=[10,20,30]))
- range (Choice(values=range(1,10)))
- arbitrary set of comma-separated values (Choice(values=(30,50,100)))
- Example QUniform(min_value, max_value, q), QLogUniform(min_value, max_value, q), QNormal(mu, sigma, q), QLogNormal(my, sigma, q)
{
    "batch_size": choice(1, 2, 3, 4)
    "number_of_hidden_layers": choice(range(1,5))
}
Continuous Hyperparameters:
- Specified from a continuous (sliding) range of values (infinite number of possibilities).
- Example Uniform(min_value, max_value), LogUniform(min_value, max_value), Normal(mu, sigma), LogNormal(my, sigma)
{
    "learning_rate": normal(10,3),
    "keep_probability":uniform(0.05, 0.1)
}
Hyperparameter tuning: Process of finding the configuration of Hyperparameters that results in determining performance metric for which you want to optimize and selecting the best performance model
- Search Space: The set of hyperparameter values tried during hyperparameter tuning is known as the search space. E.g. sample search space indicates batch_size hyperparameter and learning_rate hyperparameter with value of mean = 10 and s.d = 3
from azure.ai.ml.sweep import Choice, Normal

command_job_for_sweep = job(
    batch_size=Choice(values=[16, 32, 64]),
    learning_rate=Normal(mu=10, sigma=3),
)
- There are different types of jobs depending on how you want to execute a workload:
- Command: Execute/run a single script.
- Sweep Job: Perform hyperparameter tuning when executing a single script. Helps you automate choosing these parameters
- Pipeline: Run a pipeline consisting of multiple scripts or components.
Note: When you submit a pipeline you created with designer it will run as a pipeline job. When you submit an Automated ML experiment, it will also run as a job.
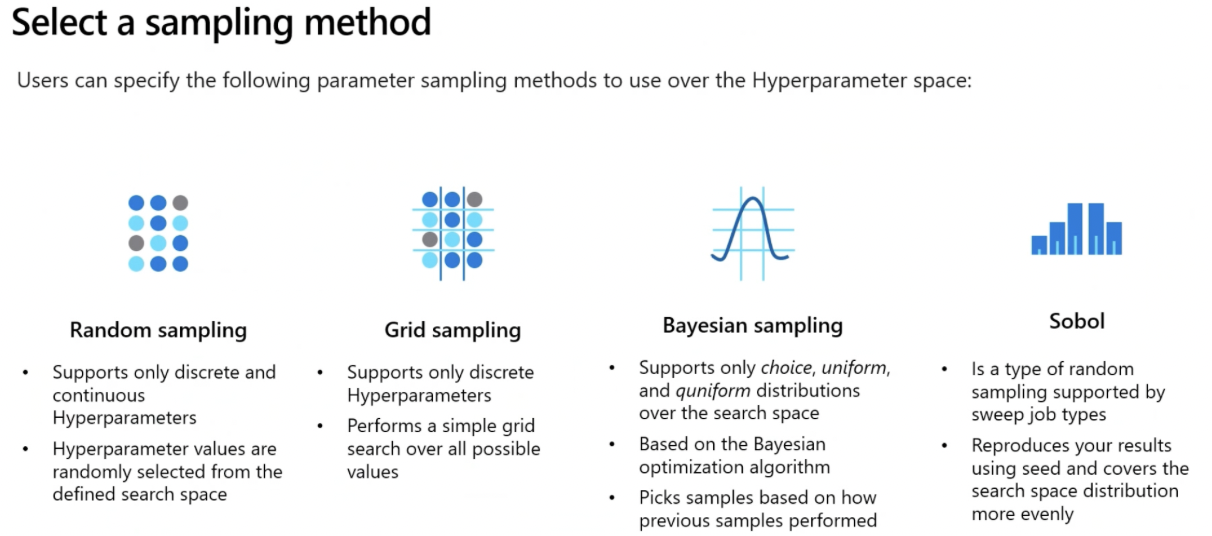
- Sampling Methods (ALSO CODES) IMP*
Define Primary Metric
- You can define the objective of your sweep job by specifying the primary metric and goal you want hyperparameter tuning to optimize.
Each training job is evaluated for the primary metric.
- primary_metric: The name of the primary metric and the name of the metric logged by the training script should be an exact match.
- goal: It can be either Maximize or Minimize. This determines if the primary metric will be maximized or minimized during job evaluation.
from azure.ai.ml.sweep import Uniform, Choice

command_job_for_sweep = command_job(
    learning_rate=Uniform ( min_value=0.05, max_value=0.1),
                            batch_size = Choice (values = [16, 32, 64, 128]),
                            # Discrete hyperparameter used here
)

sweep_job = command_job_for_sweep.sweep(
    compute="cpu-cluster",
    sampling_algorithm = "bayesian",
    primary_metric="accuracy",
    goal="Maximize",
)
Early Termination Policies*
Early Termination Policies: Strategy used to halt the training process of new models when they do not yield significantly better results compared to previously trained models. Increase efficiency and reduce costs by stopping underperforming runs early. Generally used when working with continuous hyperparameters and random or Bayesian sampling method.
- Two Parameters when using early termination policy:
- evaluation_interval: Specifies at which interval you want the policy to be evaluated. Every time the primary metric is logged for a trial counts as an interval.
- delay_evaluations: Specifies when to start evaluating the policy. This parameter allows for at least a minimum of trials to complete without an early termination policy affecting them.
Bandit Policy:
- Terminates when primary metric is not within a specified slack_factor (relative)/slack amount (absolute)
- Stops runs that perform worse than the best run by a specified margin
from azure.ai.ml.sweep import BanditPolicy

sweep_job.early_termination = BanditPolicy(
    slack_amount = 0.2,
    delay_evaluation = 5,
    evaluation_interval = 1
)
# When after first five trials, best performing model has accuracy say 0.9.
# Thus all new models must perform better than 0.9-slack_amount = 0.9-0.2 = 0.7, the sweep job will continue.
# If the new model has an accuracy score lower than 0.7, the policy will terminate the sweep job.
Median Stopping Policy:
- Terminates when primary metric value is worse than median of averages for all trials.
from azure.ai.ml.sweep import MedianStoppingPolicy

sweep_job.early_termination = MedianStoppingPolicy(
    delay_evaluation = 5,
    evaluation_interval = 1
)
# Say median accuracy score is 0.82 so far.
# Any new model should have accuracy higher than 0.82 for the sweep job to continue.
# If the new model has an accuracy score lower than 0.82, the policy will terminate the sweep job.
Truncation Selection Policy:
- Terminates/Cancels lowest performing X% of trials at each evaluation interval based on the truncation_percentage value you specify for X.
from azure.ai.ml.sweep import TruncationSelectionPolicy

sweep_job.early_termination = TruncationSelectionPolicy(
    evaluation_interval=1,
    truncation_percentage=20,
    delay_evaluation=4
)
# For example, if the primary metric is accuracy, the job continues only if a new model's accuracy is not in the worst 20% of all trials so far.
# If the fifth trial has the lowest accuracy among all trials, the sweep job stops.
Use a sweep job for hyperparameter tuning*
Steps to Optimize Hyperparameters
- Notebooks v/s Scripts
| Notebooks | Scripts |
|---|---|
| Designed for interactive training | Intended for automated training |
| Contain other content | Stripped down to (mostly) code |
| Contain alternative model ideas | Run settled models |
| On-demand code (run specific cells as needed) | On-command functions (execute without supervision) |
| Awkward to deploy in CI/CD | Enable CI/CD processes |
Run Training Script as Command Job in Azure Ml*
- Step 1: Convert Notebook to Script
- Step 2: Run a Script as a Command Job
- Step 3: Use Parameters in Command Job
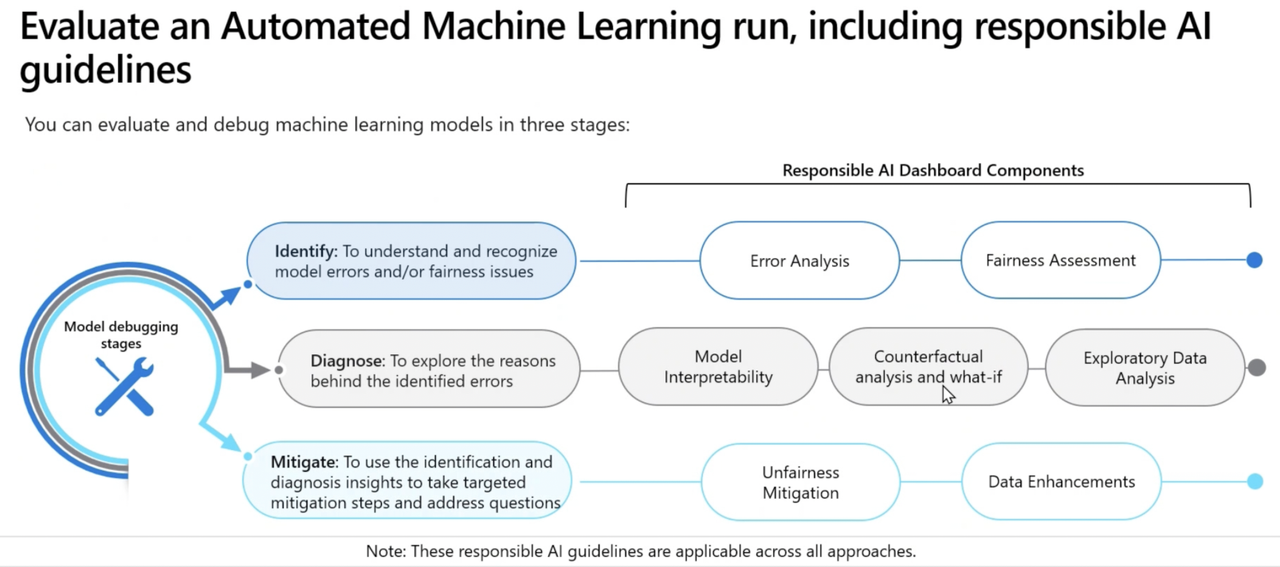
Responsible AI Dashboard*
Run Pipelines in Azure ML
Create Components
Components: Allow to create reusable scripts that can be easily shared across users within the same ML workspace. Use components to build ML pipeline
Component consist of 3 parts:
- Metadata: Includes the component’s name, version, etc.
- Interface: Includes the expected input parameters (like a dataset or hyperparameter) and expected output (like metrics and artifacts).
- Command, code and environment: Specifies how to run the code.
To create component, you need 2 files:
- Script: Contains workflow u want to execute
- YAML file: to define metadata, interface, command, code and environment of the component/ or use command_component() function to create YAML file
Code to create a Component*
- Step 1: Create a script to prepare data
- Step 2: Create a YAML file
- Step 3: Load the component
- Step 4: Register components to Azure ML workspace, to make components accessible to other users in workspace
Create Pipelines
Pipeline is a workflow of ML tasks in which each task is defined as a component. A pipeline can be executed as a process by running the pipeline as a pipeline job. Each component is executed as a child job as part of the overall pipeline job.
Build a Pipeline and Run a Pipeline Job*
Track Model with MLFlow in Jobs*
MLFlow is an open-source platform designed to streamline the tracking of model metrics and artifacts, such as experiments and models. Scripts are Azure ML development approaches well suited to monitor and evaluate Mlflow models. It supports cloud-platform and cloud-agnostic & language-agnostic capabilities of Mlflow. Install it using pip install mlflow azure-mlflow. Mlflow model can opt for no-code deployment in Azure ML. Mlflow standardizes packaging of models, which means model can easily be imported or exported across different workflows.
IMP NOTE:
MLflow is a recommended tool to deploy trained model without specifying an environment or a scoring script. Rest all Azure ML endpoint, Batch endpoint, and deploying using ONNX runtime, all require both environment and scoring script. To use MLflow, you dont require a workspace.
(I) TRACK METRICS WITH MLFLOW
Two methods to track ML jobs with Mlflow
- Enable autologging using mlflow.autolog()
- Use logging functions to track custom metrics using mlflow
(II) VIEW METRICS AND EVALUATE MODELS
When job is complete, can explore and evaluate models:
- Review metrics in Azure ML Studio
- Retrieve metrics with Mlflow in a notebook
- Retrieve runs
IMP NOTE: To use MLflow to track local experiments
Install azureml-mlflow package -> Create Azure ML workspace -> Set up tracking experiment -> Set experiment name -> Start training run
(III) REGISTER MLFLOW MODEL IN AZURE ML*
When you train and log a model, you store all relevant artifacts in a directory. When you register the model, an MLmodel file is created in that directory. The Mlmodel file contains the models metadata, which allow for model traceability. The model is logged with .fit() method
The framework used to train model is identified and included as the flavor of your model
- Some common flavors that you can use with autologging are: (Syntax: mlflow.flavor.autolog)
- Keras: mlflow.keras.autolog
- Scikit-learn: mlflow.sklearn.autolog()
- LightGBM: mlflow.lightgbm.autolog
- XGBoost: mlflow.xgboost.autolog
- TensorFlow: mlflow.tensorflow.autolog
- PyTorch: mlflow.pytorch.autolog
- ONNX: mlflow.onnx.autolog
(I) Customize the model signature
Model signature defines the schema of model’s inputs and outputs. The signature is stored in JSON format in Mlmodel file, with other metadata of model. Model signature can be created in 2 ways:*
- Method 1: Inferred from dataset
- Method 2: Created manually
(II) Understand the Mlflow model format
Mlflow uses MLModel format to store all relevant model assets in folder or directory. MLmodel file is one of the files in the directory.
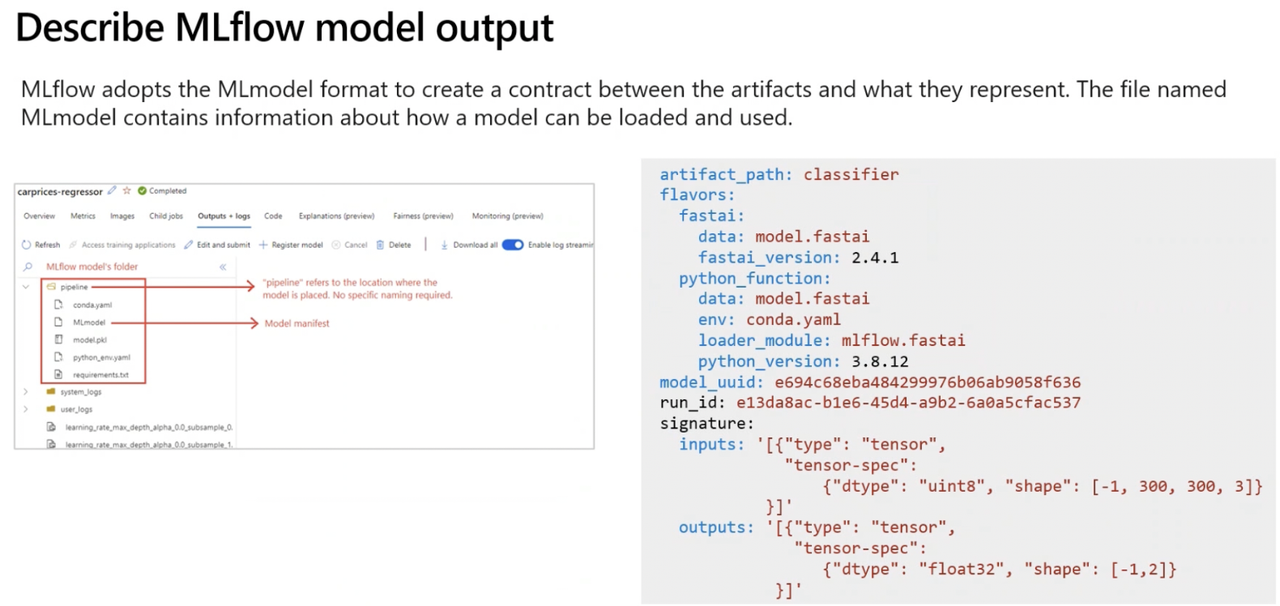
- Mlmodel file format may include
artifact_path: classifier # During the training job, the model is logged to this path.
flavors: # The machine learning library with which the model was created.
  fastai:
    data: model.fastai
    fastai_version: 2.4.1
  python_function:
    data: model.fastai
    env: conda.yaml
    loader_module: mlflow.fastai
    python_version: 3.8.12
model_uuid: e694c68eba484299976b06ab9058f636 # The unique identifier of the registered model.
run_id: e13da8ac-b1e6-45d4-a9b2-6a0a5cfac537 # The unique identifier of job run during which the model was created.
signature: # Specifies the schema of the model's inputs and outputs:
# inputs: Valid input to the model. For example, a subset of the training dataset.
# outputs: Valid model output. For example, model predictions for the input dataset.
  inputs: '[{"type": "tensor",
             "tensor-spec":
                 {"dtype": "uint8", "shape": [-1, 300, 300, 3]}
           }]'
  outputs: '[{"type": "tensor",
              "tensor-spec":
                 {"dtype": "float32", "shape": [-1,2]}
            }]'
(III) Choose the flavor
A flavor is the machine learning library with which the model was created. Python function flavor is the default model interface for models created from an MLflow run. Any MLflow python model can be loaded as a python_function model, which allows for workflows like deployment to work with any python model regardless of which framework was used to produce the model.
artifact_path: pipeline
flavors:
  python_function:
    env:
      conda: conda.yaml
      virtualenv: python_env.yaml
    loader_module: mlflow.sklearn
    model_path: model.pkl
    predict_fn: predict
    python_version: 3.8.5
  sklearn:
    code: null
    pickled_model: model.pkl
    serialization_format: cloudpickle
    sklearn_version: 1.2.0
mlflow_version: 2.1.0
model_uuid: b8f9fe56972e48f2b8c958a3afb9c85d
run_id: 596d2e7a-c7ed-4596-a4d2-a30755c0bfa5
signature:
  inputs: '[{"name": "age", "type": "long"}, {"name": "sex", "type": "long"}, {"name":
    "cp", "type": "long"}, {"name": "trestbps", "type": "long"}, {"name": "chol",
    "type": "long"}, {"name": "fbs", "type": "long"}, {"name": "restecg", "type":
    "long"}, {"name": "thalach", "type": "long"}, {"name": "exang", "type": "long"},
    {"name": "oldpeak", "type": "double"}, {"name": "slope", "type": "long"}, {"name":
    "ca", "type": "long"}, {"name": "thal", "type": "string"}]'
  outputs: '[{"name": "target", "type": "long"}]'
- Configure the signature
There are two types of signatures:
- Column-based: used for tabular data with a pandas. Dataframe as inputs.
- Tensor-based: used for n-dimensional arrays or tensors (often used for unstructured data like text or images), with numpy.ndarray as inputs.
Deploy and Consume Models with Azure ML*
(A) Deploy Model to MANAGED ONLINE ENDPOINT (REAL-TIME ENDPOINT)
Endpoint: It is an HTTPS endpoint to which you can send data, and which will return a response (almost) immediately. Any data sent to the endpoint will serve as the input for scoring script hosted on the endpoint. The scoring script loads the trained model to predict the label for the new input data, which is also called inferencing. The label is then part of the output that’s returned.
Types of online endpoint:
- Managed online endpoints: Azure Machine Learning manages all the underlying infrastructure if you use managed online endpoint.
- Kubernetes online endpoint: You i.e. users manage the underlying infrastructure (Kubernetes cluster) if they you use Kubernetes online endpoint.
To deploy model to a managed online endpoint, need to specify 4 things:
- Model assets like model pickle file, registered model in Azure ML Workspace
- Scoring script that loads the model
- Environment which lists all necessary packages that need to be installed on the compute of the endpoint
- Compute configuration including compute size and scale settings to ensure you can handle amount of requests the endpoint will receive
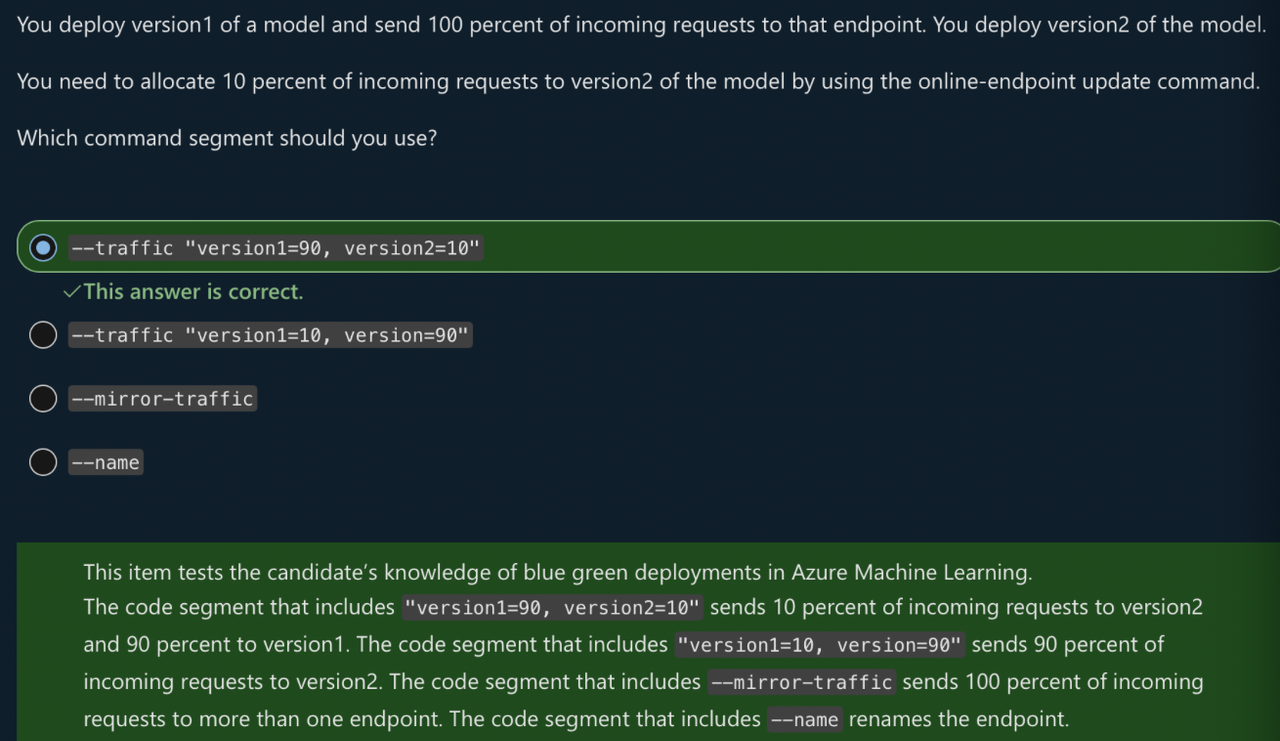
NOTE: BLUE/GREEN DEPLOYMENT
- Blue/green deployment allows for multiple models to be deployed to an endpoint. You can decide how much traffic to forward to each deployed model. This way, you can switch to a new version of model without interrupting service to customer.
- When request is send to endpoint, 90% of traffic can go to blue deployment, and 10% of traffic can go to green deployment. With two versions of model deployed to same endpoint, you can easily test the model.
- After testing, if it turns out better, you can redirect 90% of traffic to green deployment and if not so, you can roll back to first version of model i.e. 90% to blue deployment.
Create an online endpoint using ManagedOnlineEndpoint class
from azure.ai.ml.entities import ManagedOnlineEndpoint # using ManagedOnlineEndpoint class

# create an online endpoint
endpoint = ManagedOnlineEndpoint(
    name="endpoint-example", # Name of the endpoint. Must be unique in the Azure region.
    description="Online endpoint",
    auth_mode="key", # Use key for key-based authentication. Use aml_token for Azure Machine Learning token-based authentication.
)

ml_client.begin_create_or_update(endpoint).result()
(I) DEPLOY MLFLOW MODEL TO A MANAGED ONLINE ENDPOINT*
(II) DEPLOY MODEL TO A MANAGED ONLINE ENDPOINT WITHOUT USING Mlflow MODEL FORMAT*
TEST MANAGED ONLINE ENDPOINTS
- Method 1: Use Azure ML Studio -> Endpoints page -> Test the endpoint using studio
- Method 2: Test using Python SDK.
- Send data to deployed model in JSON format with following structure
{ "data":[ [0.1,2.3,4.1,2.0], // 1st case [0.2,1.8,3.9,2.1], // 2nd case, and so on... ] } - And the model will display the response
# test the blue deployment with some sample data
response = ml_client.online_endpoints.invoke(
endpoint_name=online_endpoint_name,
deployment_name="blue",
request_file="sample-data.json",
)
if response[1]=='1':
print("Yes")
else:
print ("No")
- Send data to deployed model in JSON format with following structure
(B) Deploy Model to BATCH ENDPOINT
Endpoint: It is an HTTPS endpoint that you can call to trigger a batch scoring job from another service like Azure Synapse Analytics or Azure Databricks. A batch endpoint allows you to integrate the batch scoring with an existing data ingestion and transformation pipeline.
Note: Models requiring complex and time consuming jobs, can be deployed to batch endpoints as it does not require immediate response. Anything that is conducted on an hourly, daily, or weekly schedule is more likely best suited to a batch endpoint. This is because batch endpoints are designed for asynchronous and high latency tasks.
Create batch endpoint, using BatchEndpoint class.
# Batch endpoint names need to be unique within Azure region.
# create a batch endpoint
endpoint = BatchEndpoint(
    name="endpoint-example",
    description="A batch endpoint",
)

ml_client.batch_endpoints.begin_create_or_update(endpoint)
Deploy model to a batch endpoint
Multiple models can be deployed to batch endpoint. The default deployment is used unless specified. Whenever you call the batch endpoint, it triggers a batch scoring job.
- Compute clusters can also be used for batch deployments (enables processing in parallel batches). Code to create compute cluster for batch deployment:
from azure.ai.ml.entities import AmlCompute

cpu_cluster = AmlCompute(
    name="aml-cluster",
    type="amlcompute",
    size="STANDARD_DS11_V2",
    min_instances=0,
    max_instances=4,
    idle_time_before_scale_down=120,
    tier="Dedicated",
)

cpu_cluster = ml_client.compute.begin_create_or_update(cpu_cluster)
(I) DEPLOY MLFLOW MODEL TO A BATCH ENDPOINT*
(II) DEPLOY A CUSTOM MODEL TO A BATCH ENDPOINT WITHOUT USING MLflow MODEL FORMAT*
INVOKE AND TROUBLESHOOT BATCH ENDPOINTS
1. Invoke batch endpoint:
- When you invoke a batch endpoint, you trigger an Azure ML pipeline job. The job will expect an input parameter pointing to the data set you want to score.
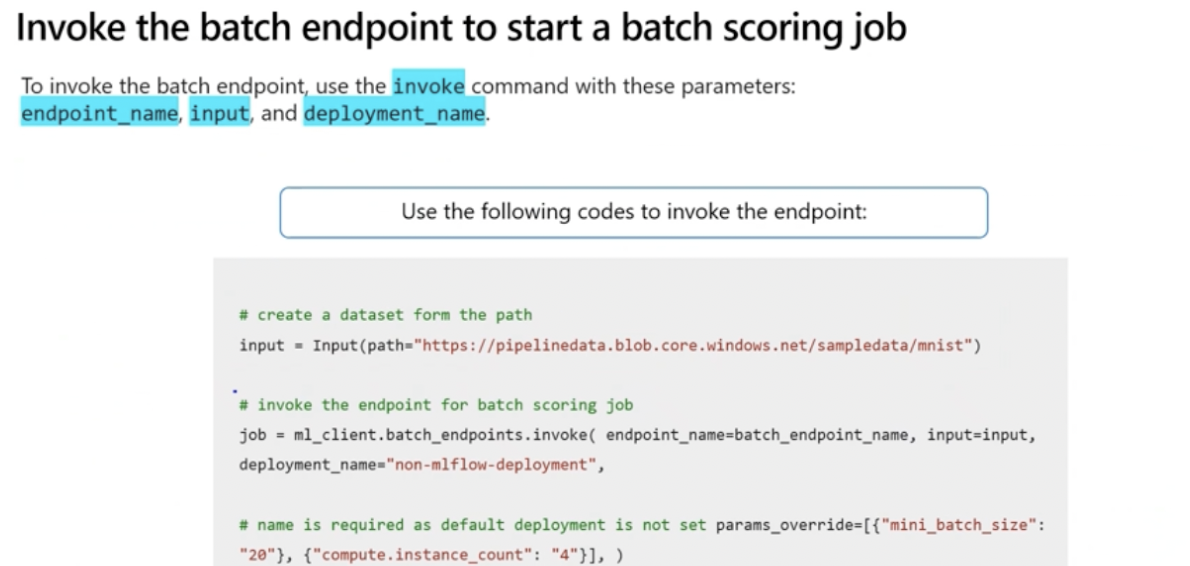
2. Trigger the batch scoring job:
- To prepare data for batch scoring job, register a folder as a data asset in Azure ML workspace. Then use registered data asset as input when invoking the batch endpoint with python SDK
from azure.ai.ml import Input
from azure.ai.ml.constants import AssetTypes

input = Input(type=AssetTypes.URI_FOLDER, path="azureml:new-data:1")

job = ml_client.batch_endpoints.invoke(
    endpoint_name=endpoint.name,
    input=input)
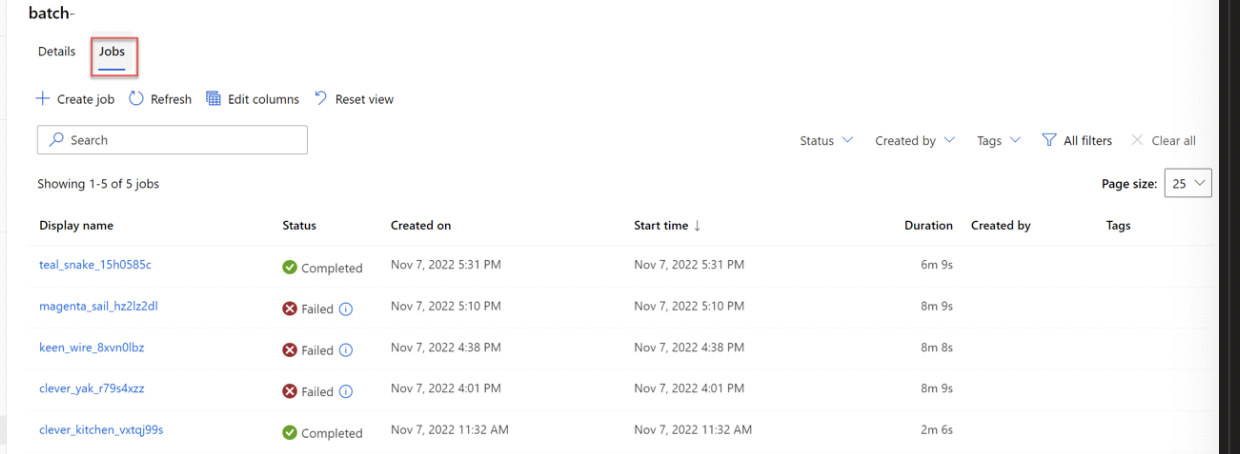
3. Monitor run of pipeline job in Azure ML Studio in Jobs tab:
- The predictions will be stored in the default datastore
4. Trouble shoot a batch scoring job:
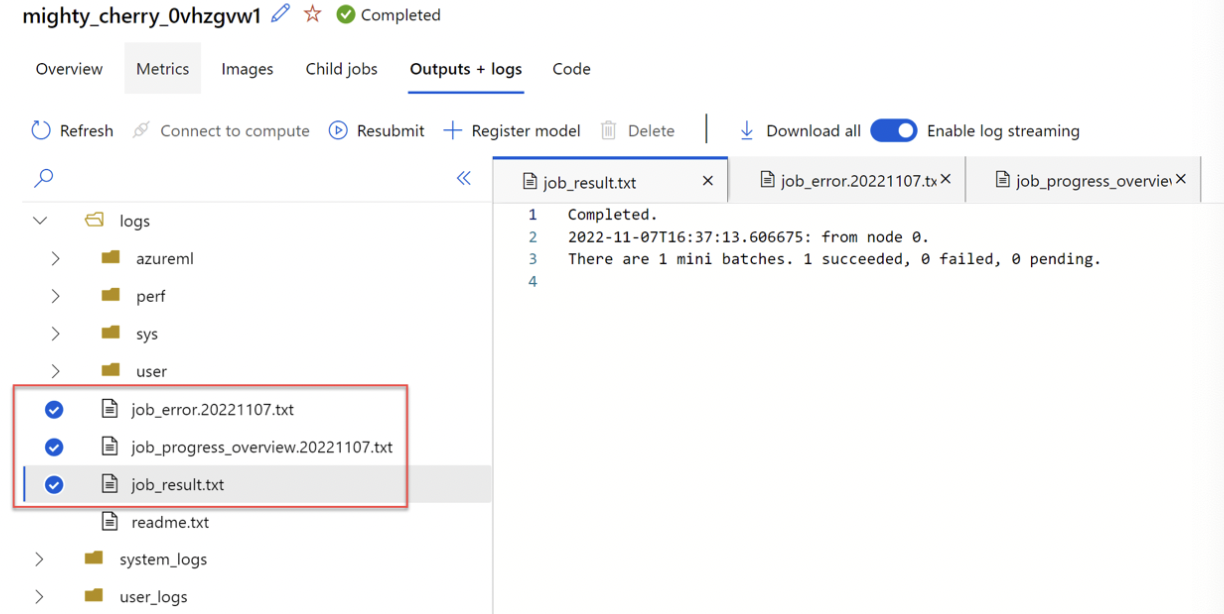
The batch scoring job runs a pipeline job. If you want to troubleshoot pipelinejob, you can review its details in Outputs and Logs of pipeline job. If you want to troubleshoot the scoring script, go to child job -> outputs + logs tab -> logs/user/folder contains 3 files that will help troubleshoot
- job_error.txt: Summarize the errors in your script.
- job_progress_overview.txt: Provides high-level information about the number of mini-batches processed so far.
- job_result.txt: Shows errors in calling the init() and run() function in the scoring script.
IMP:
- To deploy a model as a real-time inferencing model for production, Azure Kubernetes Service (AKS) is preferred, because it offers all production grade requirements including high scalability, high performance, and appropriate security for ML model.
IMP:
- Managed online endpoint: provides scalable real-time inference and doesn’t need infrastructure management
- Kubernetes online endpoint: provides scalable real-time endpoint, but requires team to manage the infrastructure
- Batch endpoint: doesn’t provide real-time inference
- Local web service: not scalable, while still requiring your team to manage infrastructure
Trigger Workflows on Github
GitHub Actions can also be used for MLOps to automate Azure ML tasks, such as data processing, model deployment, and training. Workflows are defined using YAML and stored in the .github/workflows directory of your code repository.

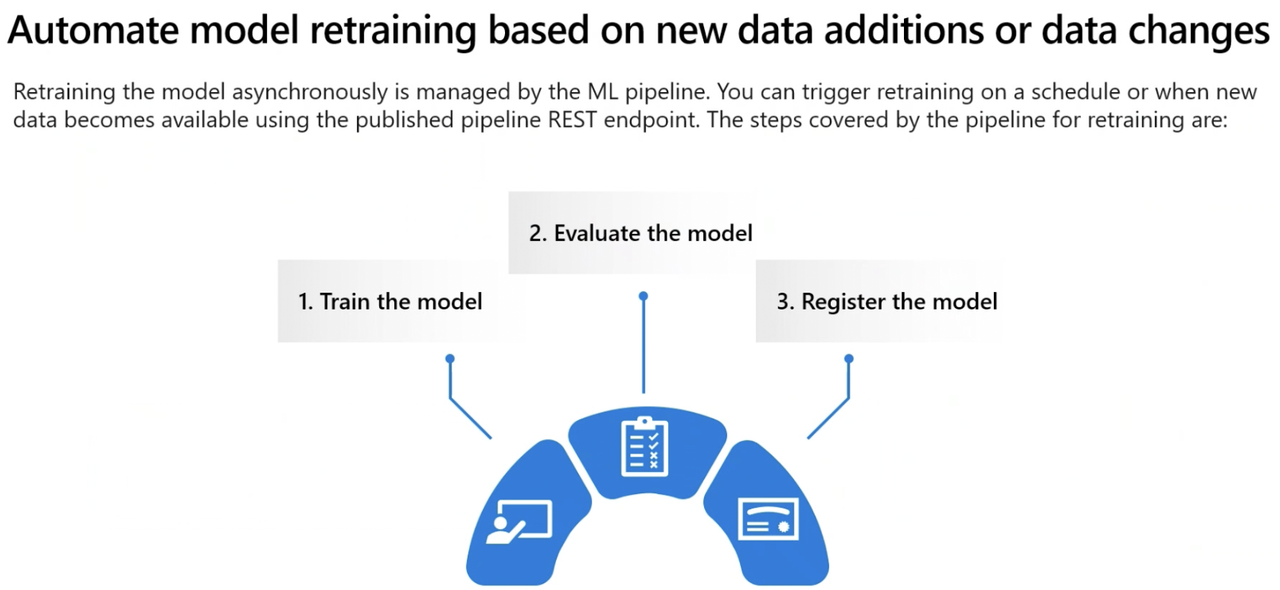
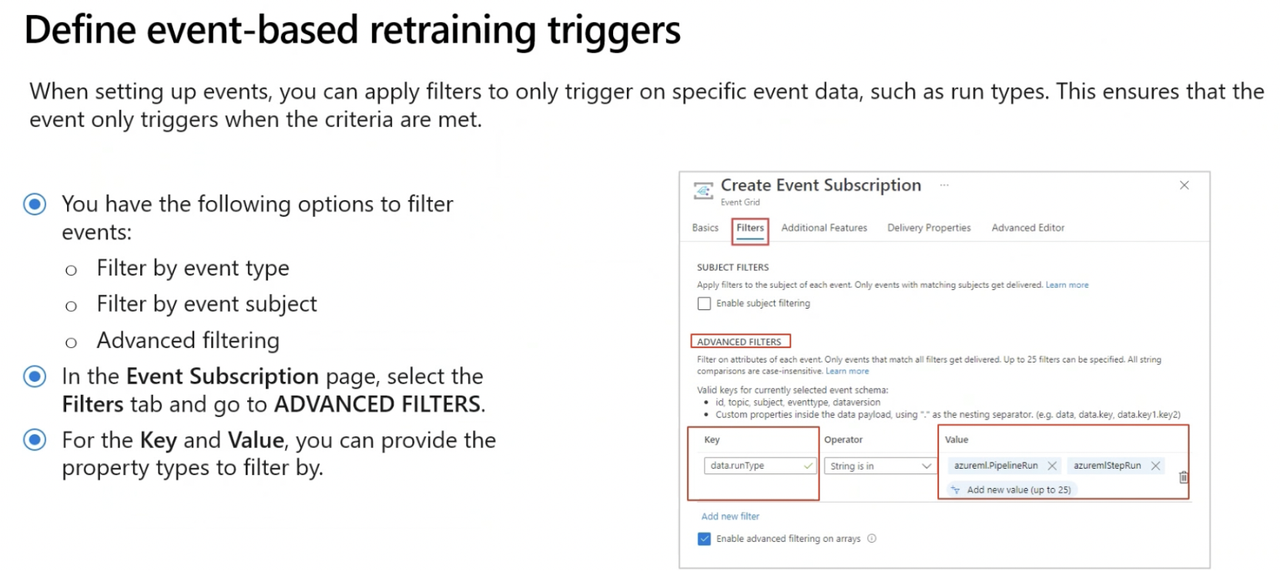
You can use Azure Event Grid to set up a trigger for sending an email to the data science team when data drift is detected on an Azure Machine Learning pipeline. Create a topic on the pipeline and a subscription for Logic Apps as the event handler to send the email.
Some Tricky Microsoft Practise Assesment Qs IMP